We make and assemble everything in Petaluma, California, and our products are manufactured to the highest standards. We also manufacture world-class assembly tables, accessories, and tooling.
Our products are virtually unsurpassed when it comes to service life, durability, ease of maintenance and simplicity in user training. Just about anyone can master any of our machines with minimal training. We are committed to our customers, dealers, and machine operators, and take pride in our friendly and effective customer service. We are pleased to have contributed to the ever-growing use of pocket joinery.
About Castle
We use local vendors wherever possible and as an American machinery manufacturer, Castle champions the cause of the American entrepreneurial woodworker. We develop products that support woodworking shops of all sizes in their efforts to be productive and successful.
It all started when founder Max Durney, then a partner at an architectural millwork firm, was trying to find an assembly solution for store fixtures he was shipping overseas. Max wanted to produce fixtures that could be shipped flat, site-assembled, and which would have strong, stable joints when put together. Max solved his dilemma by creating an entirely new joinery method: pocket cutter joinery. This new method included machining a pocket using a router, drilling a pilot hole from the opposite side, and then fastening the parts with screws through the pocket into the adjoining part.
Many years and numerous patents later, Max’s solution is still known today, industry-wide, as the “Castle low-angle pocket.”
At Castle, our dedication to quality, service, and support is evidenced in our products and in our loyal customer base. We strive to always deliver value to our customers, market partners, suppliers, and employees.
FAQs
HOW DO I FIND MY SERIAL NUMBER On My TSM-20/21?
Facing the front of your machine, the serial number is located at the top left side under the work-top. The serial plate is silver and red and indicates your 5 digit number.
WHAT TYPE OF WARRANTY DO YOU OFFER?
Castle Machines are warranted for one (1) full year from the date of purchase against workmanship or material defects under recommended use and service. Castle, Inc. is not liable for failures or injuries due to negligence, misuse, alteration, unauthorized service, or accidents. If you have a warranty issue, please contact your Castle Dealer or Castle, directly. To receive a call back, leave a message with your name and telephone number, model number, serial number, and a brief description of the issue. We will get back to you as quickly as possible.
How Is The Castle 110 Different From The Basic Pocket Jigs That Use A Drill Bit?
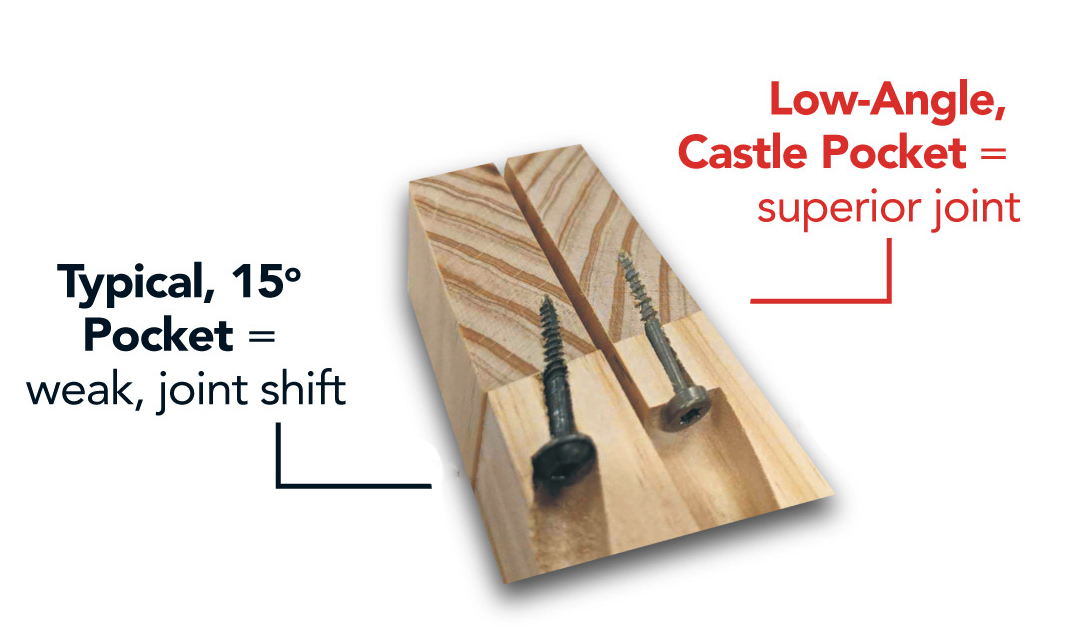
 There are several major differences. The biggest one is the Castle 110 cuts a 3-degree pocket while the pocket joinery drill guides (using a “2-step” drill bit) drill 15-degree pockets. Why does this matter? Since the screw enters at such a low angle (3 degrees) there is a lot less chance of the two work pieces shifting while assembling them. Another major difference is the Castle 110 cuts the pocket with a router (uses a solid carbide downcut spiral router bit). This means the pockets are crisp and clean even in composite materials like plywood. This is important because you can cut clean pockets on composite materials like plywood and it doesn't destroy the outer veneers like the 2-step drill method. Also, since the Castle pocket are so clean, our pocket plugs blend in much better. Please see the photo below showing cutaway joints of the 15-degree pocket hole next to the Castle 3-degree pocket. The image shows the shifting/misalignment that can occur, and also highlights just how close the screw tip is to the edge on the 15-degree pocket. A typical failure/fracture can occur right at the tip of the screw where it is closest to the edge, leaving a visible fracture on the surface of the work and creating a weaker joint. The Castle joint is typically much stronger due to the screw being closer to the center of the work piece.
What Thickness Of Material Can I Use With The 110?
The Castle 110 was designed for material thicknesses from ½” to 1”, but can handle materials down to 7/16” and up to 1 ½” thick. When cutting pockets materials thicker than 1”, we recommend pocketing both sides of the material for stronger joints.
Are Clamps Still Needed While Assembling The Joints?
We encourage woodworkers to try the “no-clamp” method with the 110. If you have been using clamps with your current pocket joinery you might be more comfortable continuing the use of clamps. Since the Castle 110 produces a low angle pocket, the chance of any shifting overpowering clamps is practically zero. This is a known problem the 15-degree drill guides. In general, the low angle really minimizes a lot of problems that frustrates woodworkers with pocket joinery.
Any Tips On Using The “No Clamp” Method?
Softer woods are typically a little easier than hardwoods when using the "no clamp" method. And of course, straight-grained woods without knots make this process even easier. In woods like oak, the combination of hard and soft grains can contribute to a misaligned screw start by the screw tip diverting to the soft grain. To combat this, you can either run the screw spin backwards briefly or use low pressure at the start. In both cases, it will dig a starting hole more centered with the pilot hole. While the "no clamp" method does take a bit of practice, we recommend clamps if the user is more comfortable with them or if it is a critical joint that absolutely must not shift. In all cases, the Castle 3-degree pocket greatly reduces angular screw pressure to make accurate assembly easier and faster.
How Do I Change The Router Bit?
We have a great video on changing the router bit here. Also, there is a great tutorial in the user manual. Here is the link to the manual.
What Screws Are Recommended?
Castle Torx screws are required to maintain the 3-degree pocket geometry. We currently sell them in 1 ¼” and 1 1/2” lengths. Washer head screws are not compatible with the Castle 110 Pocket system.
What Screw Lengths Do I Use?
In general, use 1 ¼” screws on ½” stock and 1 1/2” screws on ¾” and up material. Since the web is adjustable on the Castle 110, you can finetune the length of screw you have to the thickness of the material you are using. We recommend cutting a test pocket to test if enough thread “stick-out” to bite onto the opposing part.
What Is The Web?
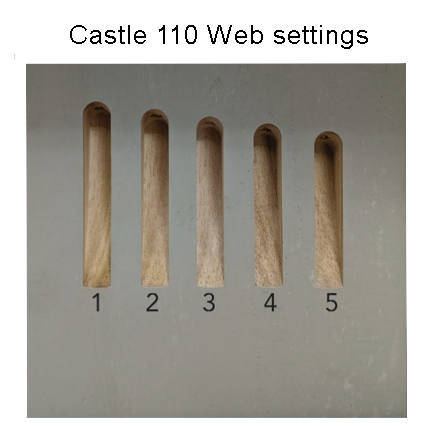
 The web is the distance from the end of the material to the start of the pocket. The web is important because you can adjust the web so that you have the appropriate amount of screw thread “stick-out” that will enter the opposing part. The 5 adjustable web settings is a very unique feature of the Castle 110.
Does The Castle 110 Need To Be Adjusted To Use Different Thicknesses Of Materials?
In general, you can just adjust the web with regards to your screw length and material thickness. If pocketing 7/16” to 5/8” material, simply place the included overlay plate on the work deck and proceed as normal. The router bit height does not need to be changed.
Does It Take Longer To Cut A Pocket With The Castle 110?
The short answer is no. With proper technique and practice you can cut pockets in the same amount time or even shorter than it takes to drill pockets with a 15-degree pocket hole jig.
Does The Castle 110 Only Cut A Partial Pilot Hole For The Screw?
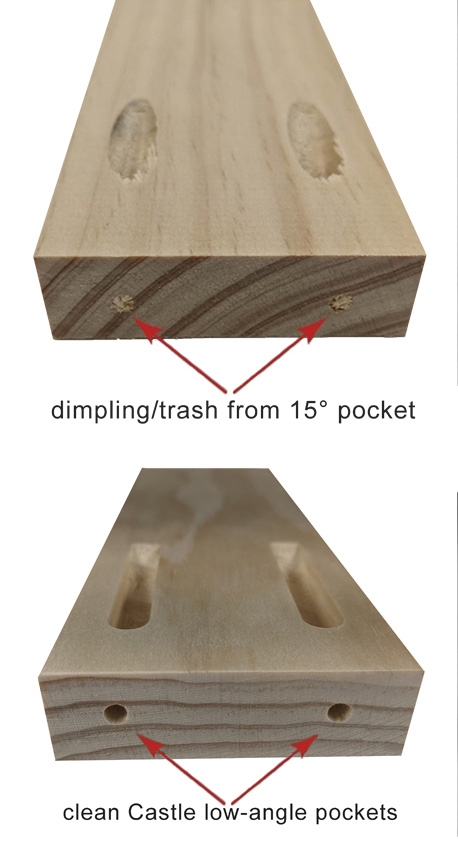
 No. Unlike 15-degree pocket hole methods, Castle pilot holes are a "through" hole. The 15-degree drilling method leaves a dimple or trash right at the end of the pilot hole. This dimple/trash material can fall out during assembly and remain between the 2 surfaces causing the joint to not fully close. Glue can complicate the matter since it will hold the trash when applied to the joint. Since the Castle pilot hole is drilled all the way through (our direction of the drilling also helps), dimpling/trash is not a problem.
How Do I Support Long Parts Or Larger Panels?
Material supports can be quickly made by taking scrap wood and screwing them together at 90 degrees. A scrap of 2x4 and a piece of plywood at the same height of the work table work great. Simply screw the two pieces together and clamp the support to your bench. The Castle 110 is also mobile. While most of the time the user may want the unit clamped to a bench, you can bring the Castle 110 to the work. Let’s say you have a large case side sitting on saw horses and it need screw pockets around the perimeter. You can simply move and clamp the 110 around the perimeter to cuts pockets. Also, your drilling away from you and not towards you in that scenario which can be a benefit in a lot of cases.
I Have Never Heard Of Castle Before, Who Is Castle?
Castle has been making screw pocket machines for about 35 years. In the commercial world, the Castle pocket is somewhat the "Kleenex" for pocket cutters. Our smallest machine (beside the 100 and the 110) is a bench top model called the TSM-12. Most of our pocket cutters are floor units about the size of a table saw. We even have a model called the CSI that not only cuts the pocket, but pre-inserts a screw in about 1.5 seconds. The 110 is nice because it’s not only small and affordable, it cuts the same great Castle pocket.
Do You Offer Plugs To Cover The Pocket Holes?
Yes. We offer plugs in white oak, red oak, maple, cherry, and ash.
Do I Need To Glue The Joints I Assemble With Screw Pockets?
Most Castle screw pockets are strong enough that glue is not necessary. One area we recommend glue is when 2 mating surfaces are visual and finish will be applied. Glue will bond the joint so that the 2 surfaces can’t expand/contract over time at different rates. Otherwise, you will eventually see a slight “lip” as the wood moves. Some woodworkers may choose to glue all joints.
Do You Sell A 230v Version For Europe?
Currently, we do not offer a 230v European version of the 110. Please check back around September-November 2021.
Technical Documents & Operator Manuals
Dust Panel DXF file links:
For Serial Numbers up to 121460:
For Serial Numbers 121460 and up:
TSM-22
DISCONTINUED PRODUCT DOCUMENTS
Castle 100
30 EXPRESS
EQUALIZER EDGEBANDER


 There are several major differences. The biggest one is the Castle 110 cuts a 3-degree pocket while the pocket joinery drill guides (using a “2-step” drill bit) drill 15-degree pockets. Why does this matter? Since the screw enters at such a low angle (3 degrees) there is a lot less chance of the two work pieces shifting while assembling them. Another major difference is the Castle 110 cuts the pocket with a router (uses a solid carbide downcut spiral router bit). This means the pockets are crisp and clean even in composite materials like plywood. This is important because you can cut clean pockets on composite materials like plywood and it doesn't destroy the outer veneers like the 2-step drill method. Also, since the Castle pocket are so clean, our pocket plugs blend in much better. Please see the photo below showing cutaway joints of the 15-degree pocket hole next to the Castle 3-degree pocket. The image shows the shifting/misalignment that can occur, and also highlights just how close the screw tip is to the edge on the 15-degree pocket. A typical failure/fracture can occur right at the tip of the screw where it is closest to the edge, leaving a visible fracture on the surface of the work and creating a weaker joint. The Castle joint is typically much stronger due to the screw being closer to the center of the work piece.
 The web is the distance from the end of the material to the start of the pocket. The web is important because you can adjust the web so that you have the appropriate amount of screw thread “stick-out” that will enter the opposing part. The 5 adjustable web settings is a very unique feature of the Castle 110.
 No. Unlike 15-degree pocket hole methods, Castle pilot holes are a "through" hole. The 15-degree drilling method leaves a dimple or trash right at the end of the pilot hole. This dimple/trash material can fall out during assembly and remain between the 2 surfaces causing the joint to not fully close. Glue can complicate the matter since it will hold the trash when applied to the joint. Since the Castle pilot hole is drilled all the way through (our direction of the drilling also helps), dimpling/trash is not a problem.


